This post may contain affiliate links. See my disclosure for more information.
I love using things in ways they weren’t intended for. Besides being conversation pieces, it makes your home personal to you. It adds character. And it can save you a lot of money!
You don’t have to be a designer or skilled in construction to create something unique.
I assure you, I am neither.
It does help that I am not a perfectionist, I will admit.
When we moved into our current house, the previous owners had begun a number of remodels that they hadn’t finished. One was tearing out a peninsula counter/cabinets in the kitchen. We loved how open it made the kitchen, but it left me with very little counter and cabinet space, and just one cabinet drawer.
I began looking at islands. Did you know that
Kitchen islands are really expensive!
Also, I saw that they all kind of look the same, and I wanted something a bit more unique. So I thought about trying to re-purpose something to create my own island. I looked at workbenches, dressers, and other furniture before finding a hutch that would work.
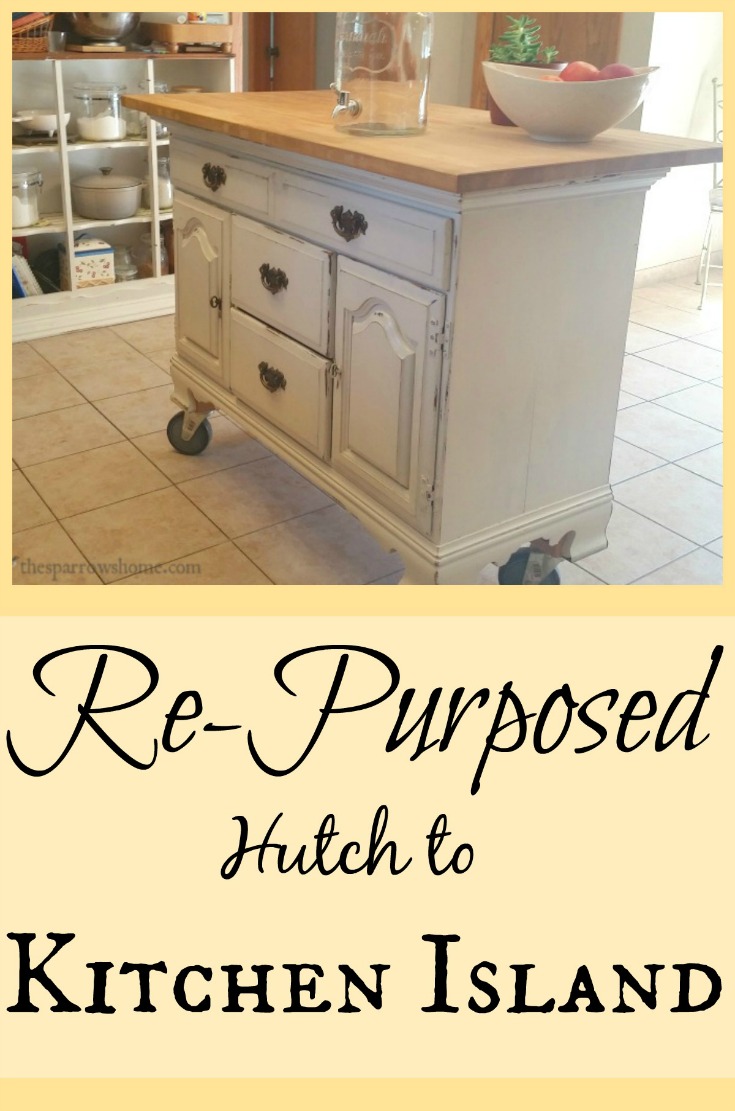
In short, we used the bottom of the hutch as the actual island and turned the shelves that sat on top of the original hutch upside down to use as storage. I’ll walk you through how we did it.
Look for good bones
Having patience to find the right piece was the hardest part of this project. I spent weeks browsing craigslist, going to yard sales, and looking in second-hand stores.
The important thing to remember when looking is that you are looking at the “bones” of the piece, not the color or finish.
I expected to have to refinish whatever we found, but was so lucky to find one that had already been redone in a way that looked great in my kitchen. If it hadn’t, I would have stripped and painted it myself. A lot of work, but not hard.
The hutch included a base that had drawers and cabinets. Perfect! It also had a shelving unit resting on top. Perfect again!

Making the Island
The first order of business was to put a usable counter top on the hutch.
We got a butcher block at Ikea. They sell a variety of wood counter tops. The one we got was about 48” long. It fit the hutch well with a little bit of overhang, which was perfect.
The butcher block top was easy to attach using construction adhesive. And after finding instructions on how to oil the wood, it was ready to use.

The height of the base was not workable as an island. So we decided to add casters to the bottom. The wheels also allow me to move it if need be. The problem we encountered was that there was nowhere to attach the casters to. So we first attached wood blocks to the bottom of the hutch, and then attached the casters to them.
I measured how high the island would need to be, and purchased casters at our local hardware store that would get us where we needed to be. They come in lots of sizes!

Since the hutch was designed to go against a wall, the back was not finished. I decided to paint it with chalkboard paint.
Usually it is our “Pray for” list. But it’s also fun to personalize for special events, like when I hosted my niece’s bridal shower. There are also two stools that reside on the chalkboard side of the island that I moved for the pictures.
The shelves
We decided to flip the shelves upside down to use, as the molding on the top made a nice, sturdy base.

Sheets of scrapbook paper act as shelf liners. It’s nice to know I can easily replace them as needed.
I always intended to do something with the top, paint it or put a piece of finished wood there, I just never got around to it.
And I like it just fine the way it is. Unfinished. Like me.
Our homes do reflect us, don’t they? We’re always looking for ways to make them more comfortable and inviting. Let me encourage you to try something a little different. You might love it!
I’ve got a few more projects I’m excited to share with you with items that I picked up at an architectural remnant store downtown. My dad helped me make a headboard from a giant piece of molding, and a light fixture from an old window, and some ceiling tin.


How clever are you? They both look great! Stopping by from Create Link Inspire and pinning to Pinterest!
Thanks, Carole!
I LOVE this!! Thank you so much for sharing with us at last weeks tomorrow! Tomorrow you will be featured when the new To Grandma’s house we go party starts, hope to see you there!
Wow! Thanks so much. I’ll be sure to post it to social media and spread the word. 🙂
I love how your upcycled kitchen island turned out. I made mine a few years ago and use it everyday. You can drop by to share yours or any other post at my weekly party. You’ll find mine on the blog side bar. Not the home page. Happy DIY ing.