This post may contain affiliate links. See my disclosure for more information.
I always have Mason jars around the house. Besides using them for canning, we use the half pint ones for juice glasses, the pint size for storing things like homemade caramel sauce and hot fudge, and all the way up to my beloved half gallon jars.
I haven’t done a lot of crafts with Mason jars, mainly because I need them to actually use. But when these shiny, painted jars caught my eye– I knew I could find a use for them as well. Win – Win.
The Idea
This is the original post for the craft I saw. I was really taken by the technique she used. Mainly because it looked so incredibly EASY! My one concern was that she wasn’t using the jars for anything other than decoration. I am not opposed to beauty for the sake of beauty. But beauty that doubles as utility is so much better!
So I made one small change that (I hoped) would allow me to create that perfect pair.
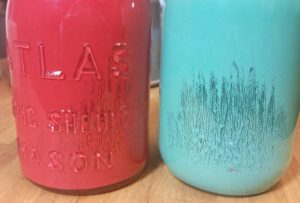
The original craft used paint samples, which I thought was ingenious! (Other, similar, crafts I’ve seen used acrylic paints). The interior paint samples may be sturdy enough, but just to be sure I decided to take it up a notch. I used exterior paint samples. My thinking was that exterior paint is meant to withstand a whole lot of wear, and therefore would be up to the task of things rattling around inside the Mason jars.
–

Clearly, these painted jars are not food safe. If that’s what you’re looking for, you’ll need to paint the outside of the Mason jars. Still pretty, but a lot messier to make, and not exactly the look I’m going for. I was really drawn to how shiny these looked, and you just don’t get that when you paint the exterior.


Although not food safe, I had hoped to try using them for wrapped food products like candy or gum. I also had my sights on a couple of the jars for school supplies, and planned to put one to the test for storing my dish brush at the kitchen sink. Others will be used to put some dried flowers in to display.
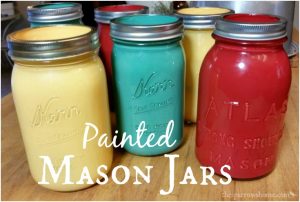
Painted Mason Jars
They really are easy to make!
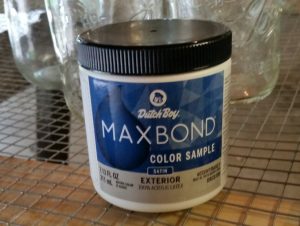
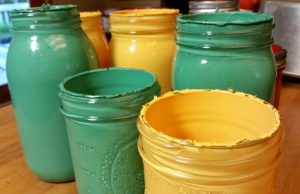
First you’ll need to pick out your paint samples. I went to my local home store and asked at the paint counter which colors could be made into exterior paint samples.
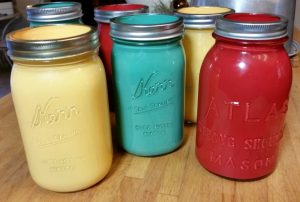
By choosing three colors, I was thinking of seasonal decorations as well as coordinating to my kitchen. The red and yellow together look like autumn to me, and swapping out the yellow for green I’ve got Christmas colors.
Before you start the project, get your drying area set up. We had some chicken wire that my husband nailed to some scrap pieces of wood. He set them up on some saw horses in the garage for me. I put some trash bags under the rack to catch drips. Make sure the drying rack elevated somewhat to get air flow up in there – even if just a few inches.

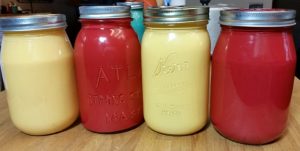
Gather your jars. I had read that about 2 ounces of paint was needed for each quart sized jar. My samples were 7 ounces each. So, allowing for a little extra, I decided to do two quarts and one pint sized jar of each color. It ended up being just the right amount. The paint was quite thick, and I’m glad I didn’t decide to try and push it.

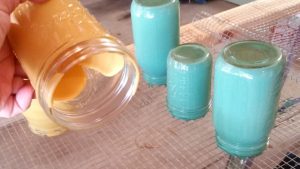
So eyeballing about a third of my paint I poured it into the first Mason jar. I tipped the jar, allowing the paint to coat the inside. As it worked its way to the lip of the jar, I found that some shaking and tapping helped coax it along (think ketchup bottle). I then stood it upside down on the chicken wire rack to drain any extra.

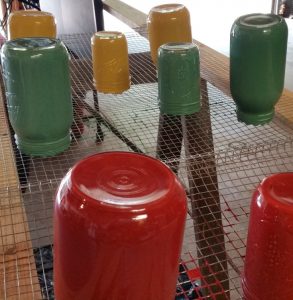
You’ll want to let them dry a long time. Over night is best. After that you can take them off of the drying rack and let them dry another day or so upright.
–

Lessons Learned
Although these are quite lovely, and I may even make more sometime, I did have some issues.
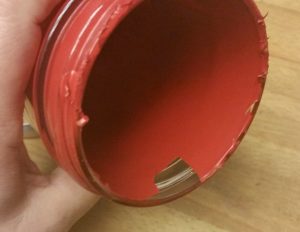
First, a few of the jars had uneven paint coverage inside. I don’t know if I totally missed this when making them, of if it had something to do with the kind of paint I used. Regardless, like most Christmas trees, these jars will have a ‘side that needs to face the wall’.
I had expected, based on how they dried, that there would be some drippy bits coming out of the tops of the jars. My first instinct was to try to pick them off.
Not a great idea. I did like my solution, however, which was to put the rings on the jars. I think that looks great. And I can easily insert the flat lid if I want the jars to be covered.
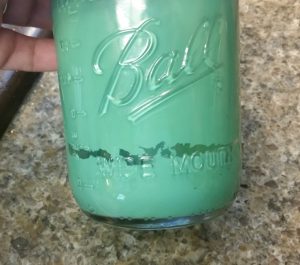
Another thing that didn’t go exactly as I had planned was the dish brush idea. It got scratched up pretty easily. (You may notice I swapped the yellow for the green jar for this. My youngest commented that “The new dish brush holder looks like it’s filled with nacho cheese”. So after a short disagreement about if the paint was more yellow-y or yellow-orangey, I made the change.) Now we’re back to using a clear jar, and this green one will be assigned a new task.
I did some other tests to check out the durability of the paint. I put a package of paper clips inside one of the larger jars and shook it around for quite some time. There were no scratches. But when I reached in and scratched a bit with my fingernail, the paint came up easily.
The jars that are being used as pen/pencil holders I also shook around a lot and didn’t notice any damage.
I think if I make more, I’ll try interior paint samples and see how they turn out. I have a feeling the paint won’t be quite as thick. (I’ll let ya know) All in all, I’m pleased, though.
So here’s my conclusion: they’re definitely easy and beautiful… but only semi-useful.
I can live with that!


I had a friend who used to make these, and I always wondered, and if I bought one what would I do with it (outside of holding my pencils). Wrapped foods is genius!!! So excited because I always thought they were so cute, but didn’t want to just add unnecessary clutter to my already toddler take-over household. 😉
Aaaand, the toddler won’t see what’s inside mommy’s secret (I-want-to-eat-a-piece-of-chocolate-late-at-night-after-everyone-is-asleep) jar. 😉