This post may contain affiliate links. See my disclosure for more information.

I promised last week when I wrote about what you need for your homeschool room that I’d share this craft with you. We made them our very first day of homeschool ever. My boys were entering 6th and 4th grades when we started homeschooling. I wanted for our first day of school to be special and fun. We planned to go out to lunch with dad and get ice cream. And I wanted to do some fun activities at home, too, something to remember our first day by.
One of the selling points of homeschool was that the boys could do their work anywhere… in their bedroom, in the treehouse, on the couch. In order to make that easier, we made these easy lap desks with cushions so they’d always have a surface to write on. As an added bonus, the lap desk surface is a whiteboard.
Easy Lap Desk Craft
Here’s what you need:

- A small white board (I got ours at the Dollar Store in the ‘teacher supply’ area). Ours had two sides, one blank and one with lines for writing. I let the boys choose which side they wanted to show.
- Fabric, a few inches larger than the white board on each side. (For this lap desk, I started with a fat quarter. When I made them with the boys, I let them each pick out some fabric.)
- Scissors
- Hot glue gun
- Plastic grocery bags
- Piece of rope, ribbon, or other trim (optional)
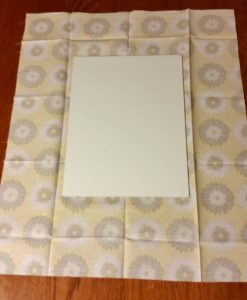
The first thing you need to do is to cut your fabric a few inches larger than your white board on all sides, and trim off the corners.


Now it’s time to start gluing. Depending on the ages of your kids, this may be a “mom’s going to do this part” part. Lay the side of the white board you want to be the top of your lap desk face down on your table. Run a line of hot glue along one of the long edges, and press your fabric (face down) onto the glue. (Tip: Don’t do the whole line at once or the glue will start to cool and your fabric won’t stick well. Do a few inches at a time). Be sure to center your fabric, and overlap a bit (maybe an inch) so there’s no chance of an accidental gap opening up.

The corners can be kind of tricky. It helps if you are not a perfectionist (that is not a problem for me). Essentially, you want to tuck in the fabric at the corners and begin gluing along the edge of the short side.
I tried to take a few pictures, but did you know it’s difficult to hot glue things and take pictures at the same time?!? (Thus the wonky, glue line in the picture below.) Again, you want to work a couple of inches at a time. This also allows you to straighten up your fabric as you go.


Turn your board, and continue gluing along the next long side. (You can see in this picture a bit how the corner turned out.)
After you have three sides done (leaving one short side open), it’s time to get your stuffing out. I fluffed each bag up a bit before shoving it in, being sure to get the bags back into the corners and edges.


I ended up using 10 bags for this lap desk.
Now you have the task of tucking in the excess fabric and gluing that last side down. I’m terribly sorry –I was so engaged in getting mine glued down, I totally spaced on taking pictures!
I didn’t use any trim on this lap desk, but in the following pictures, you can see that the one with the tree-print fabric has a piece of rope trimming the edge. It was difficult to get the ends even on that.
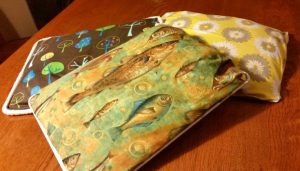

The other two lap desks in these pictures were ones that we made all those years ago. The tree one was my sample, and the fish fabric was my eldest’s pick. Somewhere along the way the Spiderman one my youngest made disappeared, but not until after several years of use.
These lap desks were fun to make, useful to have around, and a special memory of our first day of homeschooling life.
Give them a try!


Definitely going to try this for an upcoming road trip!
Oooo—fun! 🙂
I ended up getting a magnetic whiteboard so the kids can also play with magnets while riding!
Ooo–genius!!